
Debian Repository Manager
Releasing your own software packages for Debian-based distributions is really not easy. Apart from at least basic knowledge of the packaging conventions, you have to be familiar with several different tools and know how they work together. At Kano, we push new code up to several times a day, so we made a tool to minimise the packaging overhead in our development cycle. It’s called dr and we open-sourced it just last week.
dr (short for debian repository) automates many of the tasks you would need to do to manage a small repo for any Debian-based distribution. It is written in Ruby and it builds on top of the tools you would normally use to setup a repo, such as reprepro, debhelper, debuild, or qemu. The important bit is that it hides away the complexity of each tool and let’s you focus exacly on what you need to get done. dr is also integrated with git, so you can build your packages directly from your repositories.
How it works?
dr brings all the tools under a uniform interface and lets you very quickly do various tasks, such as
- setting up a new repository,
- building and versioning packages,
- making them available for users,
- and managing your releases.
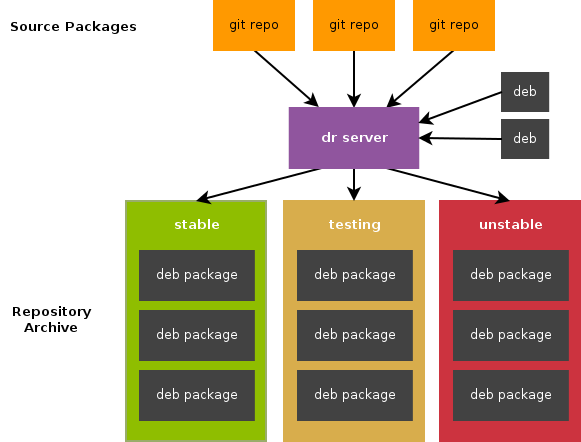
The following diagram illustrates the big picture of how dr operates. It takes your source packages that are managed in git repositories, builds them, and makes them available downstream to the people who use your repository. You can push your packages into one of 3 suites, stable, testing, or unstable Your users then can select a level of stability they prefer by switching between them, just as they can in Debian.
One of the most important features is that you can build your packages directly
from your codebase and deploy them with just a single command. Your users
will receive the update, while dr takes care of the whole process
automatically. That includes pulling the changes, preparing the build
environment, installing the dependencies, building, signing, and pushing the
packages. I’m not making this up :-).
Unfortunatelly, what dr cannot do is to provide the Debian packaging files. You will still need to read through the official packaging conventions and understand how packages work.
What can you do with it?
What follows is a quick introductory guide, so you can get an idea how the dr workflow looks like. If you would like to get more detailed information, please refer to the project’s wiki on GitHub. For instance, you can get all the information you’ll need to know how to install dr on your system there.
Also, you’ll probably notice that the dr output is pretty colourful, sometimes maybe even a bit too much. The process of building packages generates loads of logs, so we’re colour-coding different types of information within these logs (such as package names and versions) to make them easier to navigate.
Setting up a repository
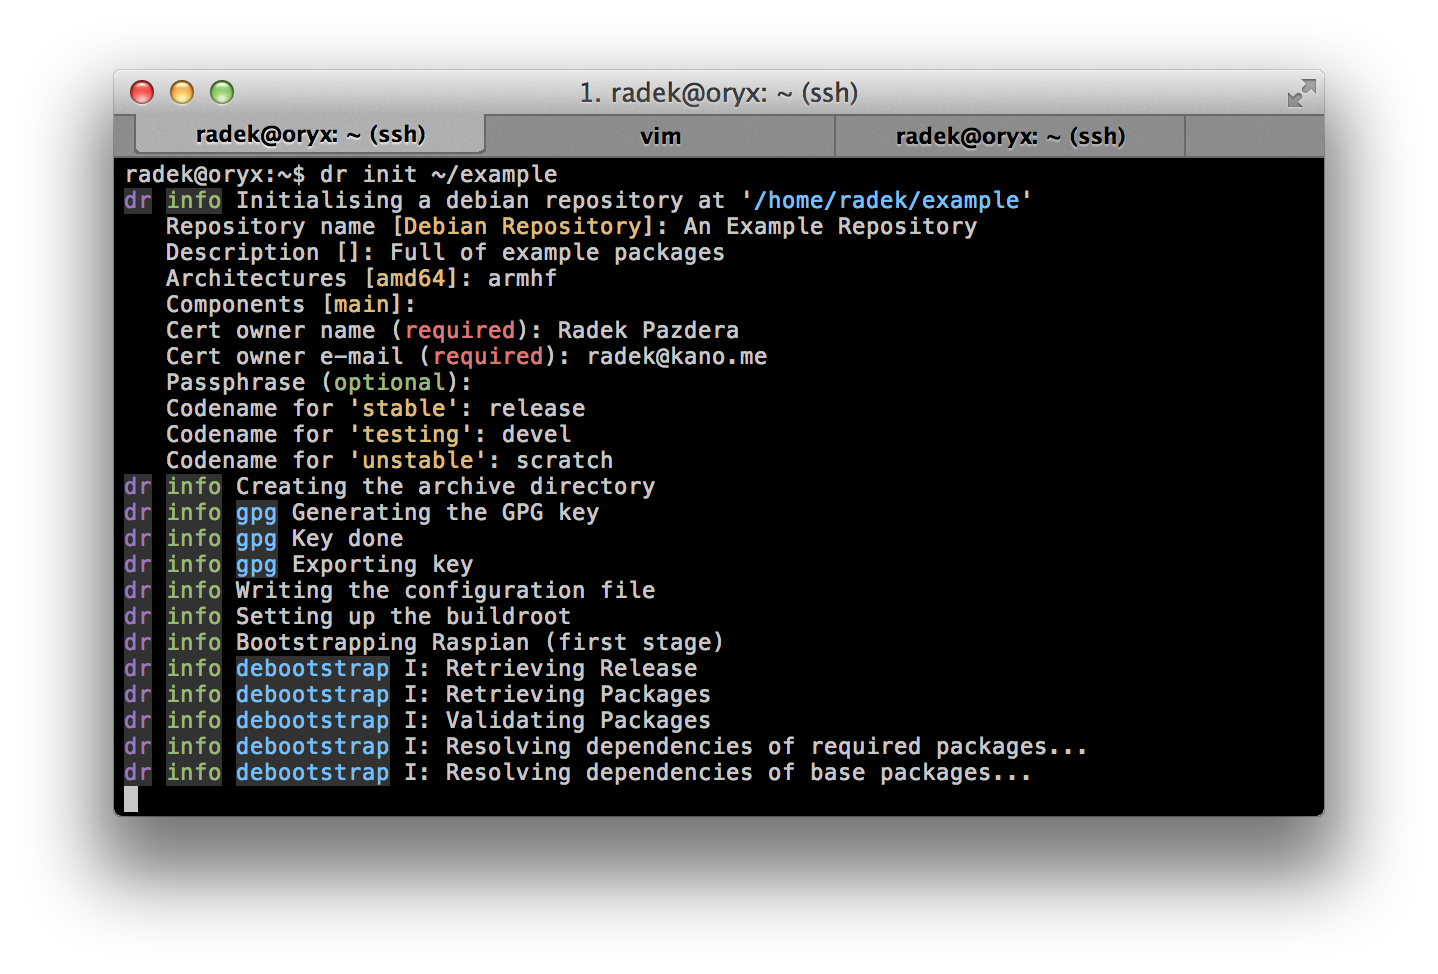
Before doing anything else, you will need to initialise your repository. dr will guide you through the whole process and do most of the work for you.
We will need to generate a GPG key in the process, so to make sure there is
enough entropy available on the system, please make sure to run the following
command before running dr init:
$ sudo rngd -r /dev/urandomAfter that, run
$ dr init <location-of-your-new-repo>dr will ask you several questions and proceed to preparing the build environment. The whole process can take up to 30 minutes to complete depending on your internet connection.
As there can be several repositories present on a single system (you can run
dr init as many times as you like), you need to tell dr which one should
be used by default. Otherwise, we would have to type --repo ~/example
with every single command. You can find how to configure this on the
project’s wiki.
Adding new packages
When adding a new package to the repository, you have two options. You can either add a prebuilt binary package, or a source package. The former is useful in case you would like to host a few packages that you manage in a different way or you didn’t build them yourself.
To add a pre-build package run the following command:
$ dr add --deb path/to/the/package_1.0-35_all.debThe full power of dr is not unleashed until you add a source package.
In that case, dr will help you manage building and versioning of the
package. To add a source package, point dr to the git repository in
which you manage your project’s sources. Git is what we use at Kano, and it
is the only supported way at the moment. Use the following command
to add a package:
$ dr add --git https://github.com/KanoComputing/kano-settings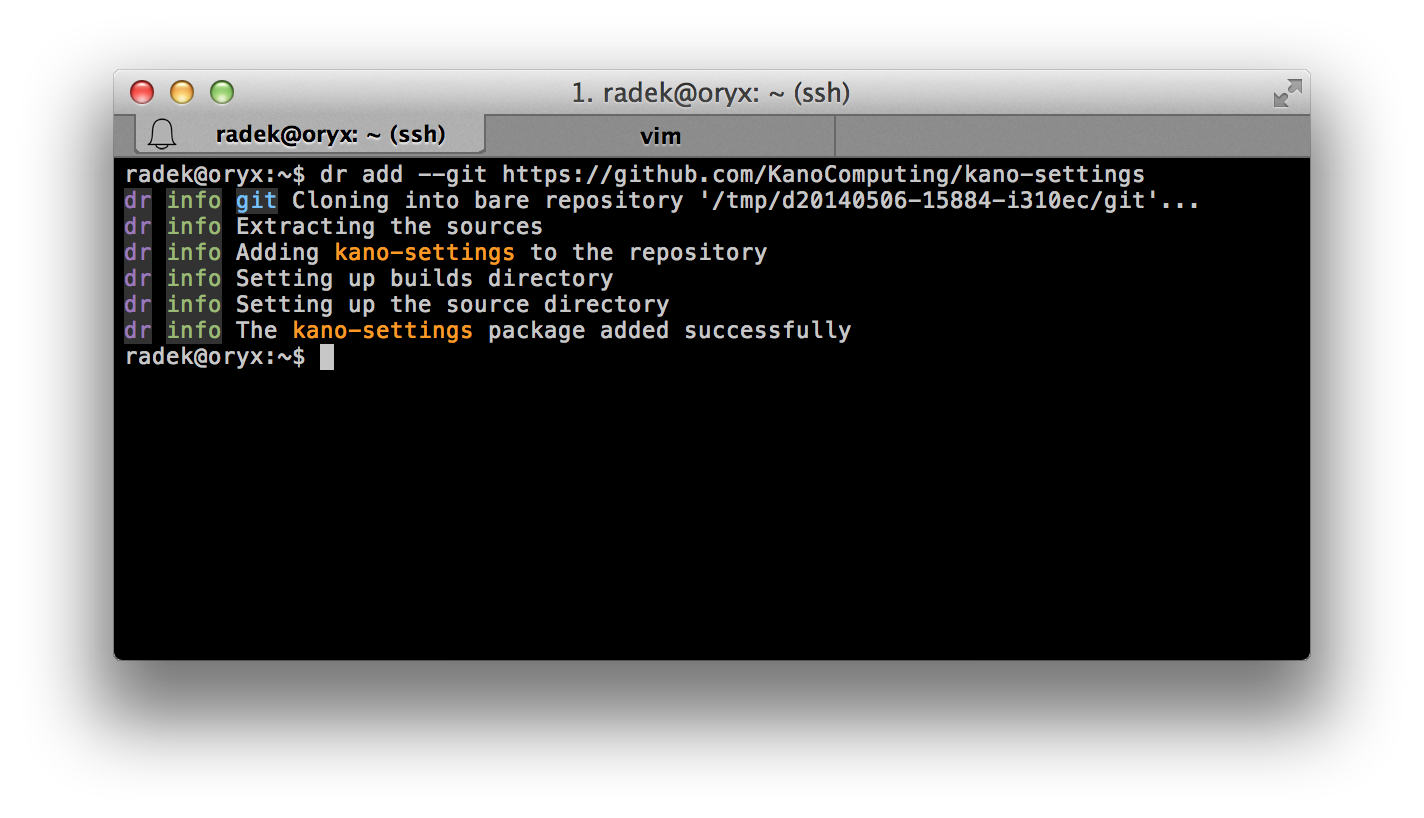
dr is clever enough to determine all the information it needs about the package automatically from the sources, so you don’t need to do anything else.
Building packages
Now when the package has been added, we need to build it. This can be done
very easily using the dr build <package-name> command.
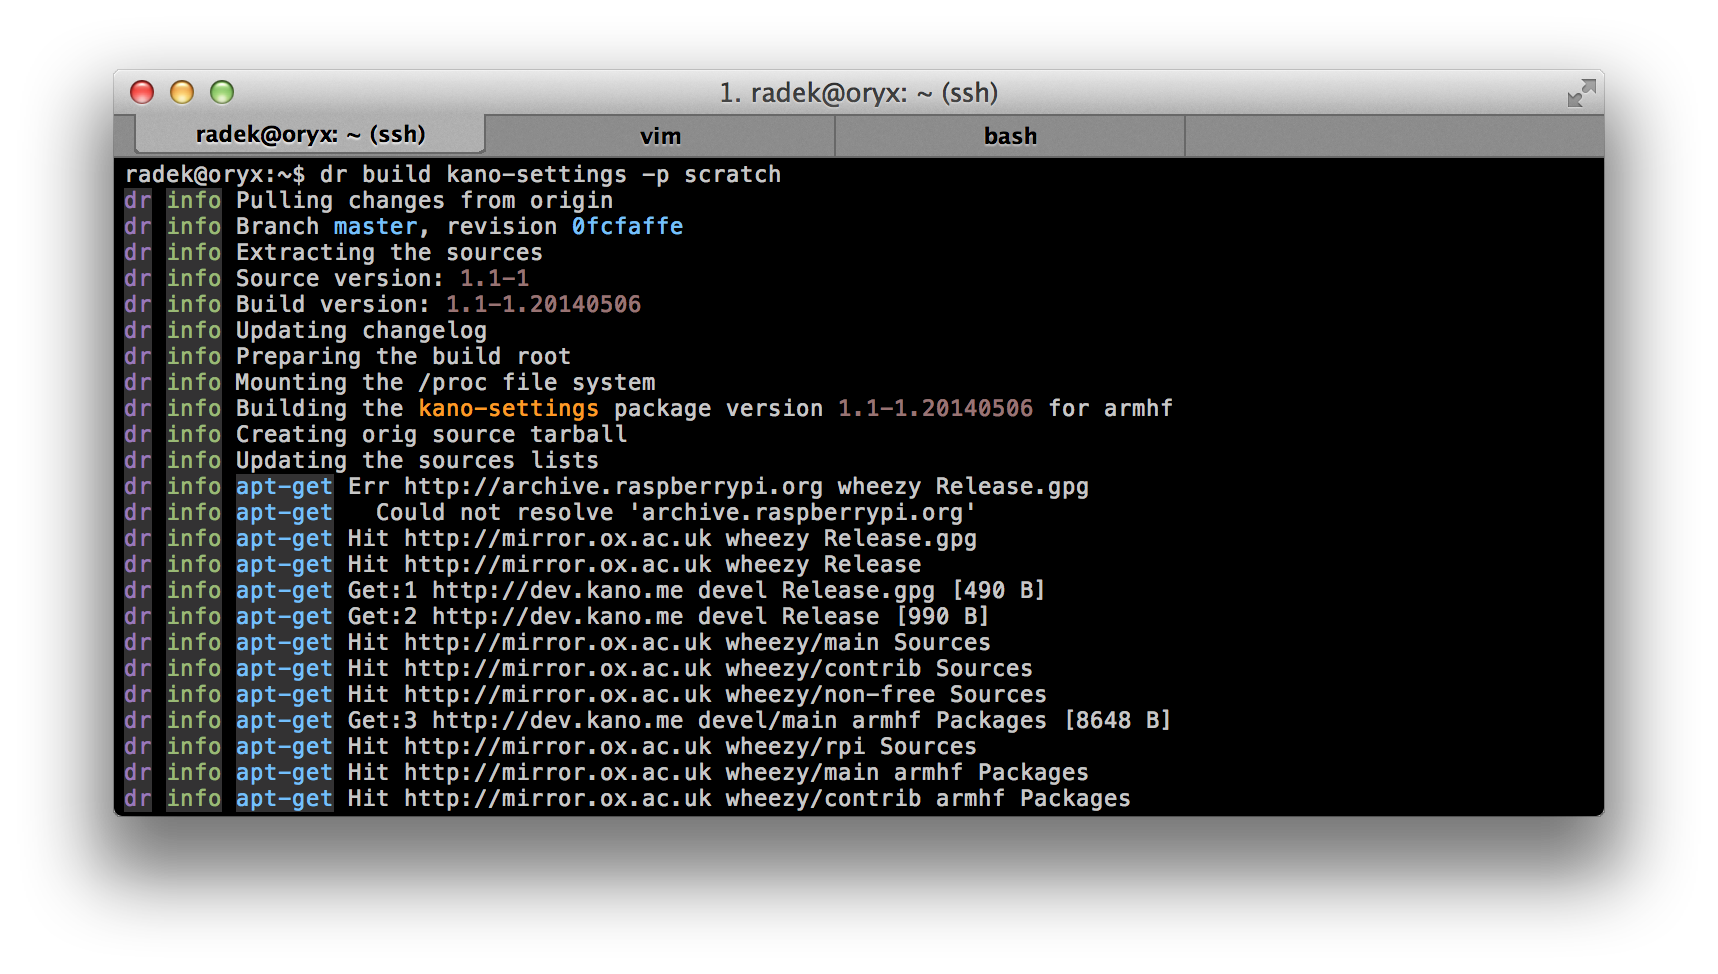
dr will switch to an isolated build environment, install all the build dependencies requested by the package and build it. We’re using foreign chroots, so you can even cross-compile packages for different architectures. Depending on how many dependencies your package has, this process should take around 2 to 5 minutes.
Running a build like this without any other arguments will build the code
from the master branch. But most of the development usually happens
outside of master in small feature branches, right? Well, in that case
you can add the -b <branch-name> option to the dr build command and
the package will be built from that branch instead. This can be
particularly useful for testing your changes in unstable, before
merging them into master.
Releasing builds
Now that a package has been built, it is time to make it available to users. This is done by pushing a build into a suite. And that’s exactly what the following command is for:
$ dr push kano-settings -v 1.1-1.20140506 -s testingBoth of the parameters, -v | --version and -s | --suite, are optional.
If you leave out the first one, dr will use the latest build
available, and if you don’t use the second one, it will push to
testing by default.
Now if you’re wondering what to do if something goes wrong, there is
a command dr unpush <package> <suite> that does exactly the opposite,
i.e., it will remove a package from a suite.
Inspecting the repo
From maintainers’ perspective, it is also important to be able to see what
packages are there in your repo and which versions are in which suite. To do
you can use the dr list class of commands. There are few things that can
be listed already (packages, suites, and versions), but many more will
be added in the future as dr grows more mature.
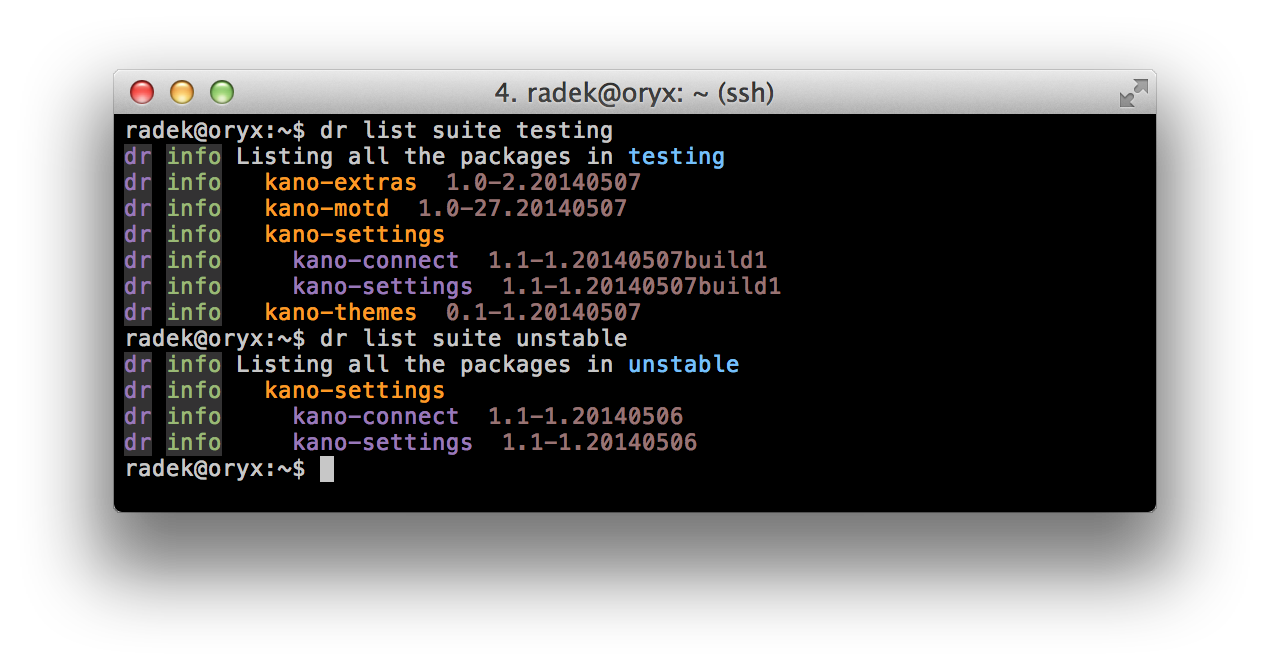
You can find more information about this sub-command on our wiki.
Summary
So this is dr. You can get it off Github or RubyGems. I hope you’ll find it just as useful as we do at Kano! We use it on a daily basis to continuously integrate all the new features and bug fixes into Kano OS, so we can move at very fast pace.
Also, please, bear in mind, that it still an early version that was build around the needs of our team, so it’s not feature complete yet. We keep adding new things as we go, so if you find something is not quite right, please let me know. Also, if you like it, you’re more than welcome to contribute!